Email Message Headers Overview
The following post will assist your understanding of email message headers, which can be helpful when troubleshooting why Zoho emails are landing in Spam Folders:
Message headers give away some important details like:
- Source of an email (From address)
- IP address/Server from which the email was sent
- Detailed footprint path through which the email was transmitted
- Message content
It is unique for each and every mail message and can be used to verify the credibility of the sender using the details it provides. In this section, you’ll learn on how to locate the header information for different email clients.
Web service providers
GMX mail
- Login to your GMX mail account.
- Open the message from your mailbox.
- Click on the more information icon given at top right corner of the email.
- The message details appear in Extended Header Information pop-up box.

Mail.com
- Login to your Mail.com account.
- Open the email from your mailbox.
- Click on the more information icon given at top right corner of the email.
- The message details appear in Extended Header Information pop-up box.

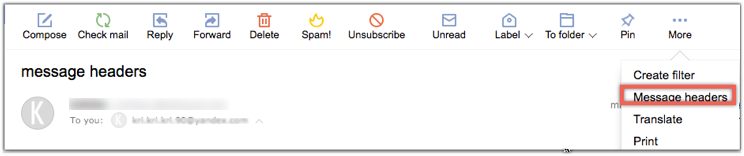
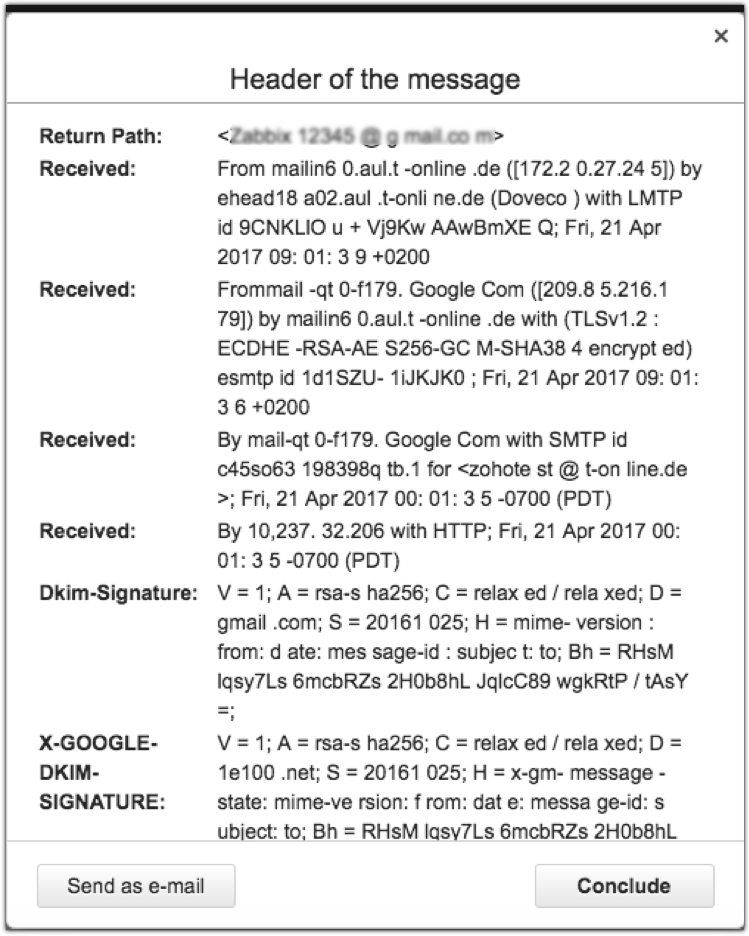
Yandex Mail
- Login to your Yandex Mail account.
- Open the email from your mailbox.
- Click on the more at the top right corner of your message pane.
- Select Message Headers option from the drop-down that appears.
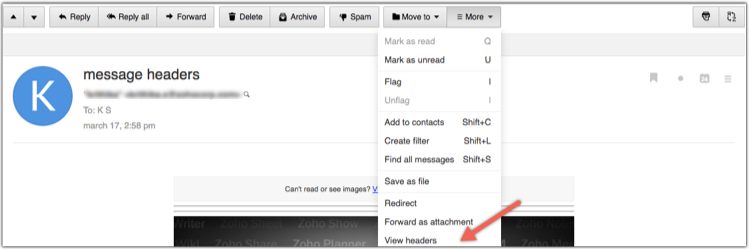
Mail.ru
- Login to your Mail.ru account.
- Open the email from your mailbox.
- Click on more icon given at top right corner of the message pane.
- Select View Headers option from the drop-down that appears.
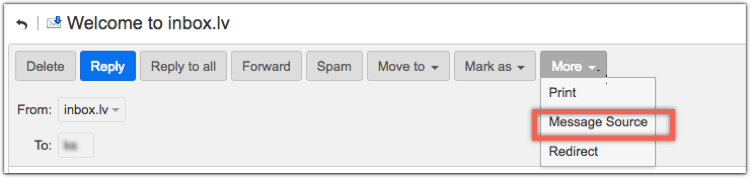
Inbox.lv
- Login to your Inbox.lv account.
- Open the email from your mailbox.
- Click on the more at the top right corner of your message pane.
- Select Message Source option from the drop-down that appears.
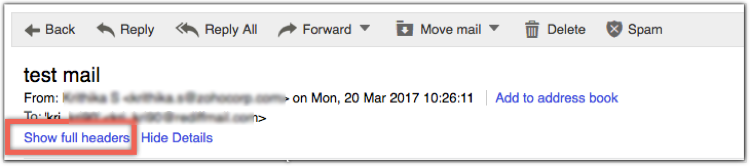
Rediffmail
- Login to your Rediffmail account.
- Open the email from your mailbox.
- Click on See Details link that appears on right of To address.

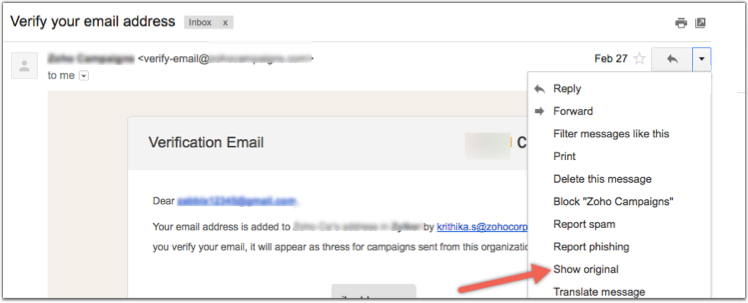
Gmail
- Login to your Gmail account.
- Open the email from your mailbox.
- Click on More button at the top right corner of the message pane.
- Select Show Original option from the drop-down that appears.
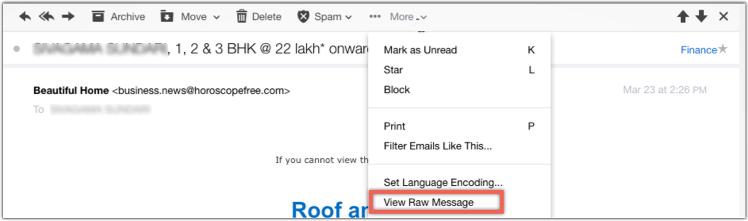
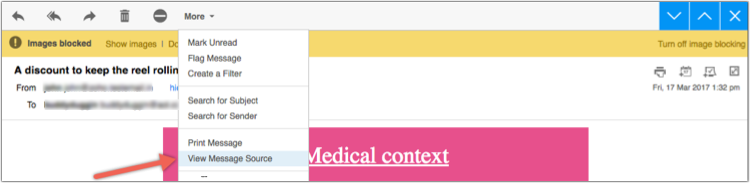
Yahoo! Mail
- Login to your Yahoo! Mail account.
- Open the email from your mailbox.
- Click on the more at the top right corner of your message pane.
- Select View Raw Message option from the drop-down that appears.
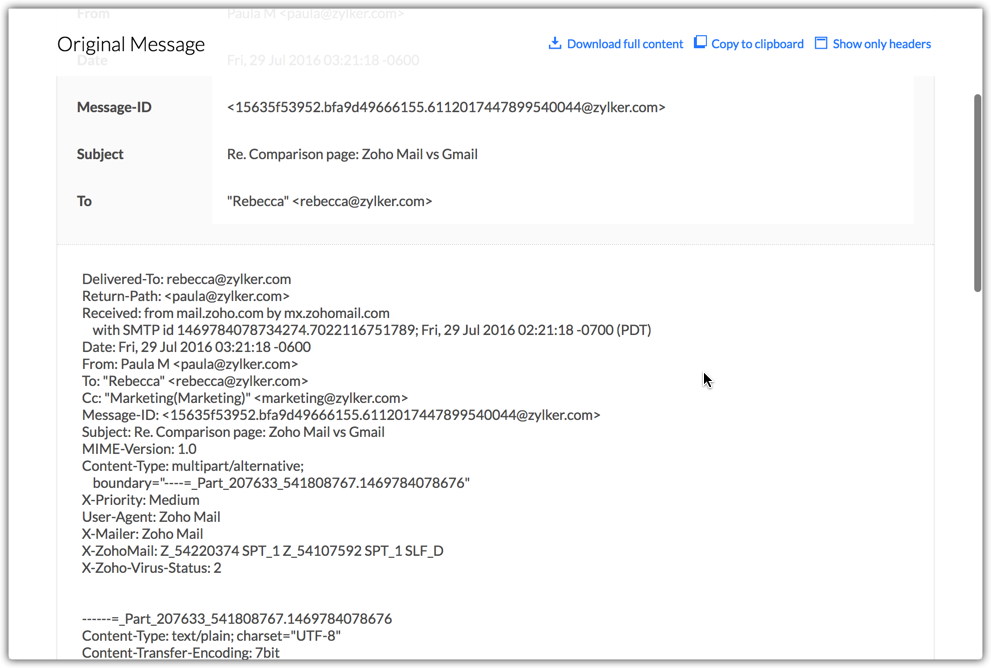
Zoho Mail
1. Log in to Zoho Mail account.
2. Open the email, for which you want to get the headers.
3. Click More Actions drop-down on right corner of the email.
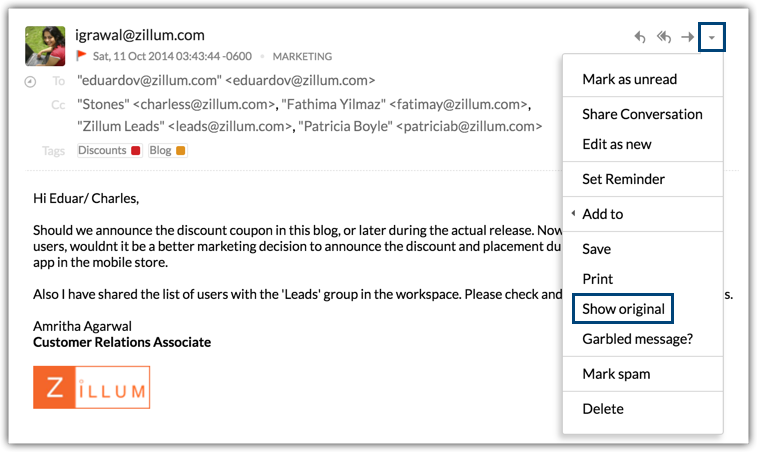
4. Choose Show Original option.
5. The header details will open in a new window.
 It contains a parameter called Message ID, which is unique to each email. Message ID is important, when you contact our support team.
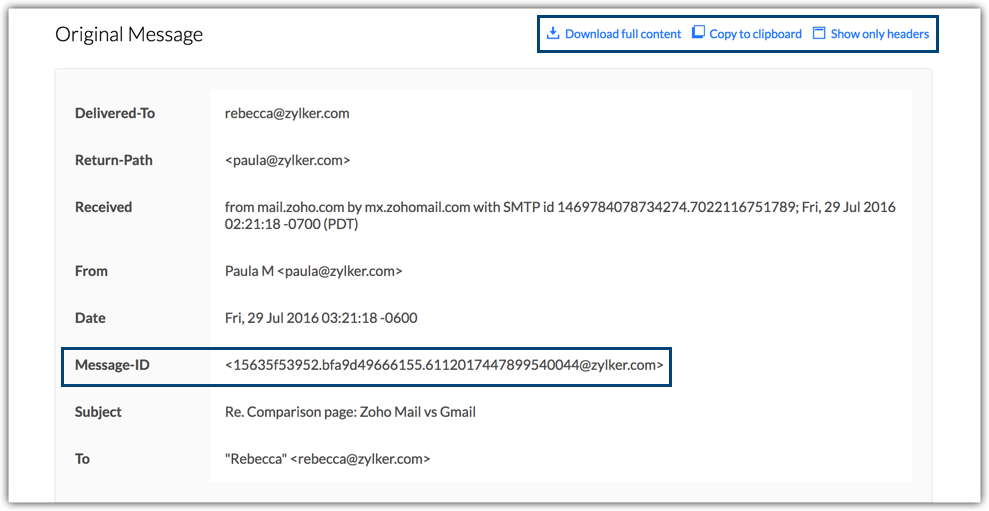
6. To download the header info as a .txt file, click Download Full Content option.
7. To copy the header info, choose Copy to clipboard option.
8. To view detailed HTML source of the email, click Show Full Content option.
Source: Zoho Mail Options
Microsoft 365 (Outlook on the Web/Hotmail/MSN)
- Login to your Microsoft 365 account.
- Click Outlook from the left panel to view your emails.
- Select the email for which you want to view the header.
- Click the More Actions (...) on the top left of your email.
- Select View and click View message details to view the message header.
AOL
- Login to your AOL Mail account.
- Open the email from your mailbox.
- Click on the more drop down in your message pane.
- Select View Message Source option from the drop-down that appears.
Telekom (t-online.de)
- Login to your Telekom (t-online.de)Mail account.
- Open the email for which you need to see the message header.
- Press the Alt Key and simultaneously click the left mouse button anywhere in your email window.
- Select Message Headers option from the drop-down that appears.
- The extended email header appears as a pop-up box.
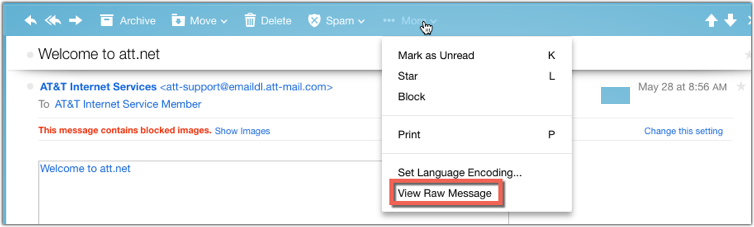
BellSouth/AT&T Webmail
- Login to your AT&T email account.
- Open the email from your mailbox.
- Click on the more at the top right corner of your message pane.
- Select View Raw Message option from the drop-down that appears.

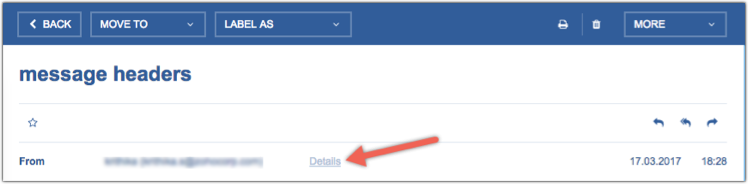
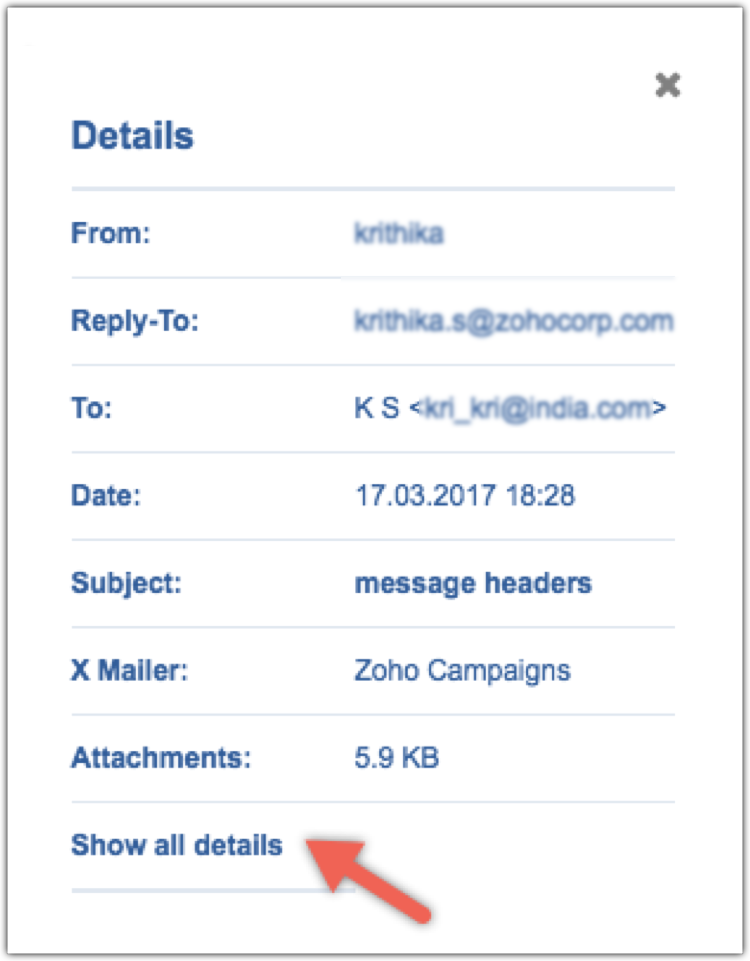
India.com
- Login to your India.com account.
- Open the email from your mailbox.
- Click on the details that appear on the right of From address.
- A separate details pop up box appears. Click on Show all details option which appears at the bottom of the pop-up box.
Desktop Email Clients
- Apple Mail
- Outlook 2019
- Outlook 2016
- Outlook 2010
- Outlook 2007
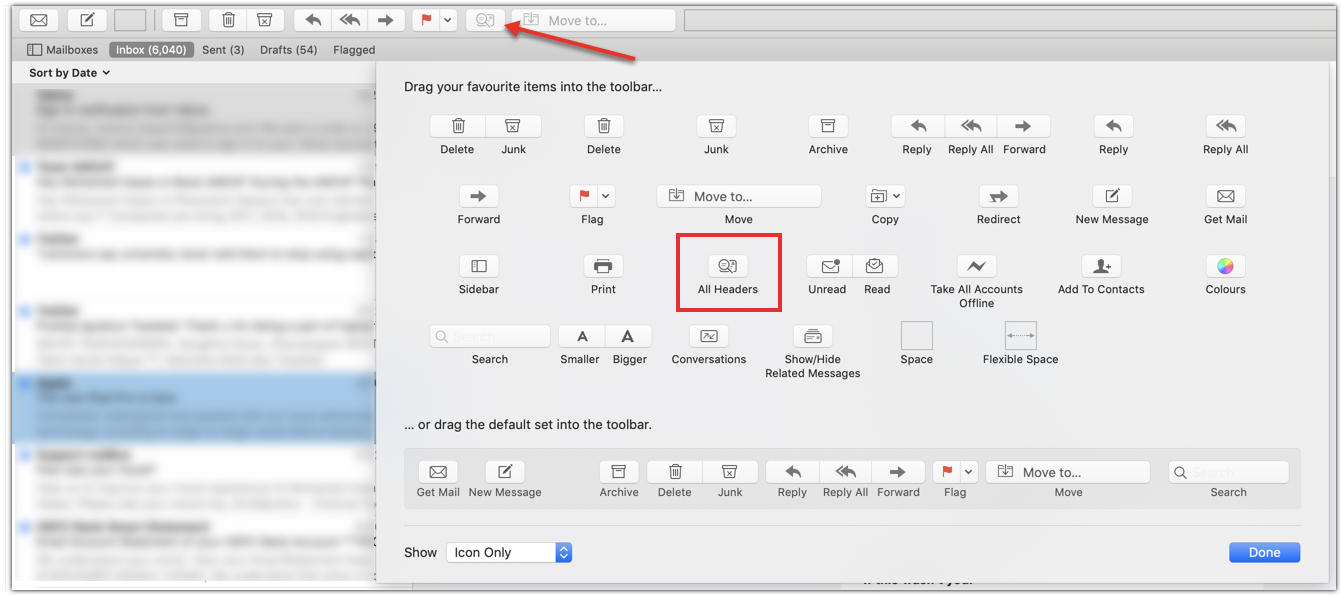
Apple Mail
- Open AppleMail .
- Double-click to open the email message.
- Choose View at the top menu and select Customize Toolbars.
- Drag the All Headers or Long Headers icon into your toolbar and save changes.
- Now, you can click on All Headers or Long Headers to the top of the toolbar.
Outlook 2019
- Open Outlook 2019.
- Select the email message for which you'd like to view the header.
- Click the more option (...) on the top left of your email.
- Select View and click View message details to view the message header.
Outlook 2016
1. Open Outlook 2016.
2. Select the email message for which you'd like to view the header.
3. In the Move section, click on Actions >> Other Actions >> Message Header.
4. The window that appears contains the header.Outlook 2010
- Open Outlook 2010.
- Select the email message for which you'd like to view the headers.
- Click on File >> Properties .
- The new window contains the headers.
Outlook 2007
- Open Outlook2007 .
- Open the email message.
- Under the Message tab, in the Options group, click on the Dialog Box Launcher icon.
- In the Message Options dialog box, the headers appear in the Internet headers box.
Related Articles
Zoho CRM Data Migration Wizard Overview
What is the Data Migration Wizard in Zoho CRM? The data migration wizard in Zoho CRM ensures that your data is migrated correctly and helps you reduce much of the manual work. It automatically maps import files to CRM modules and matches data columns ...Zoho CRM Email Tools Overview
Introduction to Zoho CRM Email Efficiently nurturing potential customers and building strong relationships is a core function of CRM. While email serves as a primary customer interaction channel, using separate email and CRM systems can lead to ...Email Features Overview in Zoho CRM
Introduction to Email Efficiently nurturing potential customers and building strong relationships is a core function of CRM. While email serves as a primary customer interaction channel, using separate email and CRM systems can lead to challenges in ...DMARC and Zoho Email Transactions
Spammers will often try to forge the "From" address in an email to deceive recipients and perform unlawful activities. Obviously mailbox providers want to prevent such emails landing in the inbox of their users, and email senders don't want their ...Zoho CRM Email Connections Overview Video
Click to view a short video on how to set up your email connectivity to Zoho CRM